Today’s topic is How To Make A Bow In Short Hair. Obviously, you can find a great deal of Easy Bow Hairstyle-related content online. The proliferation of online platforms has streamlined our access to information.
There is a connection between the Easy Bow Hairstyle and Easy Bow Hairstyle information. additional searching needs to be done for Easy Bow Hairstyle, which will also be related to How to Make a Bow Tie.
56 Tips for How To Make A Bow In Short Hair | How To Put A Bow In Your Hair For Cheerleading
- If your baby has little to no hair, these bows and flowers can be slipped on to headbands or hats. big bows for babies . Then, when your daughter is older – you can just use on her hair. best place to buy ribbon for hair bows. - Source: Internet
- Step 5 – Pinch the center as tightly as you can. Place a piece of wire in the center on the front side of the bow and wrap it around the ribbon to the backside. Secure the wire on the backside of the bow by twisting it several times. - Source: Internet
- 4 Step 4 4 Form your bow. Separate the loop down the centre with your fingers and fan it out into a bow. Secure it with pins to create your desired shape, fanning out each side of the bun with your fingers to add volume as you go. - Source: Internet
- If using clips and you want a firmer bond than the one you get with the glue, insert the ribbon to the center of the bow and loop through the arched string of the clip. Stitch the ribbon edges together, Using the hand needle and thread . Give two or three anchoring stitches to stitch the bow to the band at the back. The seam will be in the back now ofcourse. - Source: Internet
- Ribbons or fabric to make the bows. Ribbons are the favorite to make hair bows, though you can make bows with fabric as well, as you will see in this tutorial. Grosgrain ribbons are the favorite for these bows as they are thicker, durable and sturdier than ordinary ribbons and look quite good too. Check out this post on the different types of ribbons on more details on what you can use to make the hair****bows. - Source: Internet
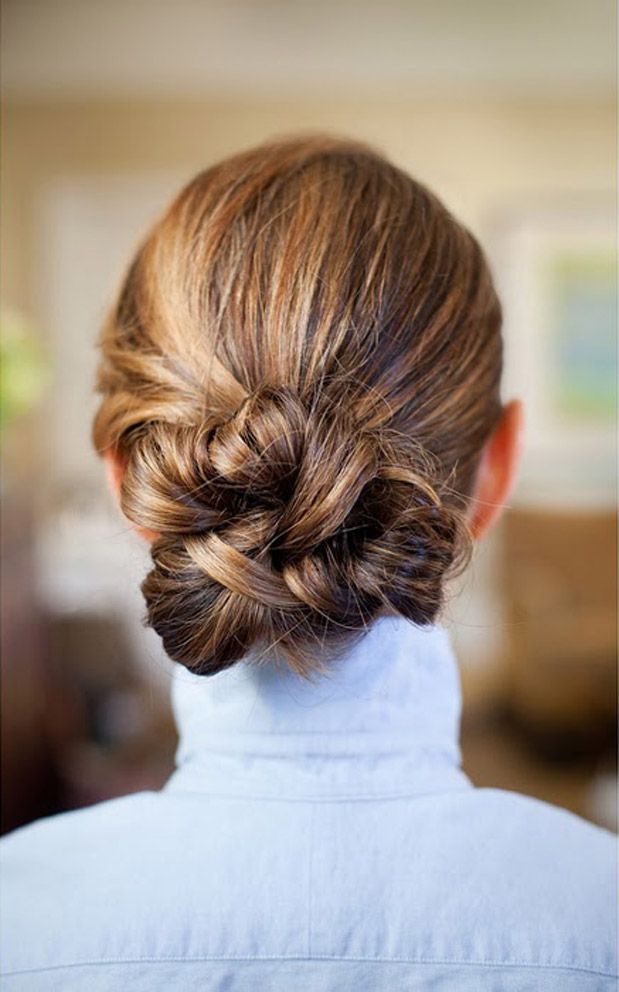
- Perfect for the festive season and beyond, a bow hairstyle is one of the cutest ways to update your coif. A magnet for “Ooh, how did you do that?” comments, this half-up, half-down look is worth learning how to conquer. Short on hair ribbons? No problem. The beauty of this technique is that it allows you to use your own hair as a DIY accessory. - Source: Internet
- Here at app of Hairbow .we are constantly looking for new and unique ways to add some flair to your daughter’s style through personalized hair accessories and we think one of the best way to do that is by creating your own, one of a kind hair bows to go with any look you desire. bow hair slides. Today we are going to talk about how to make a hair bow out of ribbon that can add that finishing touch to any little girl’s look! satin ribbon bow making. - Source: Internet
- 5 Step 5 5 Tuck the remaining strands behind your bow. Attach a bobby pin at the bottom of your remaining ponytail and then pull it upwards and over the top of the centre of the bow. Then tuck it back under the bow and pin into place behind your updo so that there is no remaining hair showing. - Source: Internet
- Fold the short edges to the middle overlapping slightly about 1/4 inch. Tie around the middle with thread first and then tie over it with the small piece of ribbon.There is your simple ribbon bow - Source: Internet
- Don’t have a baby girl? No problem. These bows would make great gifts. Some of these you could totally dress up your look with. personalized hair bows. - Source: Internet
- 3 Step 3 3 Create a loop. Create a loop in your ponytail by loosening one section of the hairband with your finger and passing the hair back through it until you create a mini looped bun. The size of the loop you create will determine the size of your hair bow so adjust it to your preference. Leave the ends loose and make sure your strands are tangle-free. - Source: Internet
- 6 Step 6 6 Set the style. Neaten up the finished look by double checking your bow looks full and use extra pins to secure any remaining loose hair. Spray the TIGI Bed Head Flexi Head Hairspray directly on your bow and then along the length of the hair to help secure the style. - Source: Internet
- Here you will find 4 hair****bow design patterns. The first instruction is bigger than others as we explain everything in detail. The rest are brief since the main concept is more or less similar. - Source: Internet
- 1 Step 1 1 Section and backcomb the hair. Section the top one-third of your hair starting at about eyebrow height and pull it into a ponytail at the back of your head. Next, lift your ponytail and backcomb the top section gently back towards the hairband. This will help shape and hold your style by adding extra volume. - Source: Internet
- Lastly, fold the piece in the middle so the tail points are both facing down and use your craft glue gun to glue it onto the back of your bow. For this bow, we added an alligator clip on the back at the very end due to the face we added the tails. If you prefer not to have tails, you can always secure the clip during the process of securing the center of the bow. - Source: Internet
- I included a super easy tutorial for how I made my bow hair tie. I have seen them available for purchase in stores- but this is such a quick project I just made one myself. Follow the jump below for the full tutorial! - Source: Internet
- Wrap the thread around center of bow. Pull tight, adjusting the center of the bow as needed as you tighten. When the thread has no more give, bring the thread through to the back and take a few locking stitches. Knot to secure, then trim the thread tails close to the knot. - Source: Internet
- 3 Step 3 3 Gather hair into a high ponytail. Position a ponytail on the crown of your head, or the exact area where you want your bow bun to sit. Don’t worry about smoothing down the base of your pony just yet. - Source: Internet
- If you want to add the tails to your bow, lay your bow out on your fabric and cut out a strip just a little bit larger than the bow itself. Proceed to cut larger triangles from the long sides of fabric, this should look like a bow when you’re finished. Next, cut a smaller triangle out of the short sides starting at the ends to give your tails beautiful points. - Source: Internet
- 1 Step 1 1 Start with clean hair. Freshly washed hair provides just the right amount of fluffy grip needed for a proper updo. Start with rinsing hair with a volumizing shampoo and conditioner (we like Dove Oxygen Moisture Shampoo and Conditioner) for that extra dose of natural fullness to start. - Source: Internet
- This bow is similar to the earlier ribbon bow but with more layers. You will be making two such ribbon bows and laying it on another ribbon cut in a shape as in the picture below. Tie them all together - Source: Internet
- This time of year there are just so many fun holidays coming up that can be made even more fun by creating your own DIY hair bows. soft baby bows. Imagine how adorable Easter, and even your Fourth of July looks can be with a custom made hair bow for your little girl! Hairclip. There are so many ways to create a hair bow, and you can find instructions to make stunning hair bows by checking out the grosgrain hair bow tutorials on our app. hair bow accessories wholesale. - Source: Internet
- Hair bows have been around for years and in general the consensus is that they are a cute accessory for little girls. However, the hair bow has a bit more history to it than just being cute. Discover the unique story and how to make a high quality hair bow for kids or adults. - Source: Internet
- bow maker.There is such a variety of tutorials so you can learn not only how to make a boutique hair bow, but how to make a cheerleading hair bow and other functional bows. wholesale hair bow supplies. - Source: Internet
- A little-known fact about me – I started a bow business back in 2001 and made hair bows and accessories for stores and boutiques. I learned how to make a basic hair bow from my best friend’s mom, who used to have her own bow business back in the ’80s and ’90s. I LOVE making hair bows! - Source: Internet
- 4 Step 4 4 Secure strands with a hair tie. Tie a fabric-covered hair elastic around your ponytail base to secure. Now is the time to refine any halo frizzies or flyaways at the base with your palms, a fine-toothed comb or even some hairspray, if you desire. - Source: Internet
- If your tresses are waist-length or longer, you can still rock a beautiful bow hairstyle. Simply work with the weight of heavier locks by using extra pins to keep your style in place, and seal in the look with a final spritz of hairspray. If you want to see how its done, follow our step-by-step guide above to see how long, full hair gives this pretty style some extra Princess vibes. Rapunzel, who? - Source: Internet
- cheer bows. Even combine products and include embellishments such as epoxy dot stickers, bottle caps, and buttons in your amazing creations. hair clippers. We have all the ribbon and supplies you need to make tons of lovely hair bows! wholesale boutique hair bows. - Source: Internet
- Slide your ribbon through the hair tie and tie a knot, then a bow. Make sure to tie it nice and tight. Then take your super glue and put a small dot on the hair tie to secure the ribbon to the tie, and another dab inside a few of the layers of the knot of the bow so that it dries and stays in place. Hold it in place for a minute to let the glue dry. - Source: Internet
- 5 Step 5 5 Add a bobby pin. Attach a bobby pin at the bottom of your remaining ponytail and then pull it upwards and over the top of the center of the bow. Then tuck it back under the bow and pin into place behind your updo so that there is no remaining hair showing. - Source: Internet
- Cut four (4) bow tie patterns and two (2) interfacing patterns each. Fuse the interfacing to the wrong side of the fabric. - Source: Internet
- When two trends collide, we couldn’t be happier. And when these come together in a delightfully meta way, then our work is practically done. The bow bun takes two hot styles—the top knot and the ribbon-hair look—and, as the name suggests, merges it into one super-cute, super-meta, super-tongue-in-cheek ’do that we’re predicting will blow up on social media very soon, if it hasn’t already. Read on to see how to recreate this (very literal) bow bun that looks way harder than it actually is. - Source: Internet
- We will need 2 pieces of 2 inches wide satin lace for the basic bow pattern. Measure and cut out 9 inches and 1-inch pieces from the selected satin lace. Use a lighter or candle to slightly burn the cut-edges of the satin pieces to secure the edge fibers. - Source: Internet
- Step 3 – Bring the ribbon (which should be behind the 2 loops out to the side below the first loop you made. Make a loop by bringing the ribbon upward from the backside of the bow towards the center. Place the end of the ribbon over the center of the 3 loops we have now made. - Source: Internet
- 6 Step 6 6 Loop hair once again into the knot. Pull the ponytail through the hair elastic one more time. Depending on how big you want the bow’s ears to be, you can either stop midway (for a smaller ribbon) or before you reach the ends (for larger loops). - Source: Internet
- I also make custom bows. Just email me your request aubrey@simplycoutureboutique.com - Source: Internet
- 8 Step 8 8 Cover your middle knot. Conceal your main knot (or where your hair tie is) with the remainder of hair that’s left loose. Loop this lock over and in between your ribbon and secure the ends with a bobby pin. - Source: Internet
- An all black look is such a good safe bet. I love wearing black, but I don’t find myself where it very often. When I do opt for all black, I like to still keep it girly and feminine. This cute top with ruffles on the sleeves, along with a simple black bow in my hair tie are 2 simple ways to keep an all black look from feeling boring. And adding a bold color or print in a coat always adds drama to an all black look! - Source: Internet
- Microwave for 1 1/2 minutes and you will get curled ribbon like this. You will have to do several trips to get many such. Just gather these by the middle and tie for a really curled bow - Source: Internet
- To secure the bow, cut a small long strip from your fabric that will wrap around the center. This time, after folding your bow like an accordion, place your new strip of fabric around it. In the back of the bow, place a small dab of craft glue in the middle of each fold. Finally, add a dab of hot glue to the center and secure one side of your fabric strip, then glue the other side. Cut off the excess and you have a bow! - Source: Internet
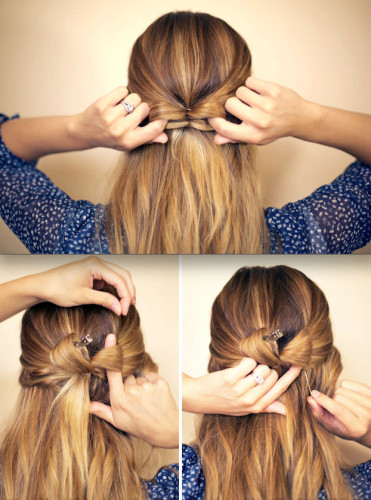
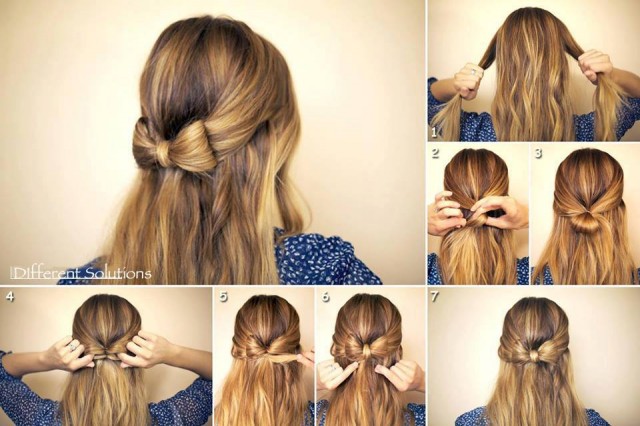
- Hey, girls, do you want to get everything funny and pretty? To make things funny, you can start with your head and have a new look for your long hair. Today’s post is going to tell you how to add a funny bow to your hair without using a ribbon or a bow hair piece. Through the tutorials, you can make a bow with your own locks easily. You can make a bow when you style a ponytail, a top bun or a half up half down hair. The bow hairstyles can always bring an ultra-funny look to girls. - Source: Internet
- This is also known as a Boutique bow – it has the look of a tied sash bow. Check out the post on tying a sash bow properly if you would rather have the original. This faux bow look just like the original at half the effort. - Source: Internet
- An alternative way is to just bring the short edges to the middle and then stitch. This is a bigger bow good for attaching on hair clips. The photographs below are from the post on making super simple hair accessories from old things at home - Source: Internet
- To make this bow, take a long length of ribbon – about 20 inches for a medium bow like mine. Cut the edges to the inside or to the side in an angle. With a cigarette lighter or candle harden the edges to prevent fraying - Source: Internet
- Hair accessories can truly add style and class to your overall outfit, along with a touch of innocence. pink hair ribbon.No matter if you like classic and practical hair bows, or if you fancy the dotted or sparkly ones that will make you stand out from the rest, here you will find easy and fun hair bow ideas! cute headbands for girls. - Source: Internet
- It’s Minki Kim, and you can find me on Instagram @zeriano and MinkiKim.com. I also design fabric for Riley Blake Designs and I have my own line of sewing patterns. I am excited to share this bow tie tutorial today. - Source: Internet
- Now, take the small satin ribbon piece. Fold the 1-inch side from both sides. This small folded piece will be the center of the ribbon bow that we’re making. - Source: Internet
- Hair bows have been worn since the 17th century. During the 17th and 18th centuries men and women used them with their wigs, with men tying their longer hair in the back with a bow. Though the trend for men dissipated, women continued the trend in the 19th century until the roaring twenties came about. At that time headbands with beads and feathers became the trend along with short hair. - Source: Internet
- Cut your ribbon the desired length you would like for your bow. I always tie a test bow first to make sure I get it the exact length I want it. I like the ends of my bow longer falling down into my ponytail. My ribbon measured 38″. Cut your ribbon at a diagonal at the ends to give it a nice finished look. - Source: Internet
- Back in 2012, my friend and I randomly decided to start our own little business. The first thing that came into our minds was handmade jewelry pieces and accessories. We already had some satin ribbons so we thought of making ribbon hair bows. And that was the first time I (along with my friend) made hair bows. We made quite some profit from our small business and the ribbon hair bows were a hit! In today’s tutorial, I’m sharing the exact technique of the hair bows that I followed and still do. - Source: Internet
- To make this cute bow Cut many ribbon pieces about 8- 10 inches long. You can take any width ribbon. If the width is less you will need more number of ribbon pieces for it to look puffy. - Source: Internet
- It wasn’t until the 1940’s the hair bow made a glorious comeback with a secret message. Girl’s would wear hair bows to reveal their love life. A bow on the top of her would mean she is single, a bow on the back would mean she is not interested. Bow worn on the right side is indicating the girl is deeply in love and the left side is to show that she is going steady. - Source: Internet
- For this hair bow pattern, take a 1-inch wide ribbon. Measure and cut out two pieces of 9 inches long ribbon and a 1-inch piece. Stitch the 2 pieces along the middle separately. - Source: Internet
- This next bow is created with the same steps, but its tails stick straight out to either side. Make the main Bow Tie Bow just like above, then cut a strip of ribbon for your tails. For the flat tails, cut the ribbon strip(s) so it extends just about ½” – 1” past the bow loop. As mentioned above, start with more than you think you might need; you can always trim the ends if need be. Place the tail strip behind the bow. - Source: Internet
- For this hair bow pattern, you will need a 2 inches wide ribbon and a 1-inch wide ribbon. Measure and cut out 9 inches from the 2 inches wide ribbon and 11 inches long piece from the 1-inch wide ribbon. Also, cut out a 1-inch piece from either ribbon. Follow the basic folding and stitch the overlapped parts as we did before. - Source: Internet
- In the market for more exotic bows? Head over to my store at www.simplycouture.etsy.com and check out my selection. - Source: Internet
 Following are some suggestions for where to begin your search for data on Pretty Designs:
You should try to find Pretty Designs-related information from reputable places. Libraries, online resources, and even paid journalists all fall under this category.
- It's crucial to be aware of the various electronic media sources available when researching Bow Hairstyle For Little Girl, such as Google and YouTube. You may also get info about Bow Hairstyle On Black Hair on social media sites like Facebook and Twitter.
Following are some suggestions for where to begin your search for data on Pretty Designs:
You should try to find Pretty Designs-related information from reputable places. Libraries, online resources, and even paid journalists all fall under this category.
- It's crucial to be aware of the various electronic media sources available when researching Bow Hairstyle For Little Girl, such as Google and YouTube. You may also get info about Bow Hairstyle On Black Hair on social media sites like Facebook and Twitter.It’s crucial to read to examine the authenticity of each source in order to acquire the greatest information regarding How To Make A Bow Bun.
Video | How To Make A Bow In Short Hair
You’ll learn more about Bow Hairstyle For Short Hair after watching the films included in this post, which come from a variety of different sources. Information on a wide range of topics can be easily accessed via the internet.
## Notable features of Bow Hairstyle On Black Hair include:- How To Make A Bow In Short Hair
- How To Make A Bow Tie In Your Hair
- How To Make A Bow In Your Hair
- How To Make A Bow With Your Own Hair
- How To Make A Bow In Your Hair Without Bobby Pins

With the abundance of how to do a bow in your hair step by step-related resources available online, it’s easy to find what you’re looking for.
This is not how most people would expect to learn more about How To Make A Hair Drawing, so be prepared for some shock value. It paves the way for a closer examination of the Bow Bun Hairstyle information’s actual substance and its potential applications.
 techniques for making Bow Hairstyle For Little Girl data visualizations that are both aesthetically pleasing and practically applicable. They can spread the word about How To Put A Bow In Your Hair For Cheerleading in professional and promotional settings. For this reason, we also include How to create a bow hairstyle: Your ultimate guide-related pictures.
At last, this article sums up key points about How to Make a Bow Tie. There is also a comparison of your HAIR BOWS MAKING FOR BEGINNERS: Style Your Hair with Different Hair Bow Patterns and Learn to Make Them Yourself knowledge to that of how to make a bow in your hair with braids, as well as a discussion on How To Make A Hair Drawing and how to make a bow in your hair without bobby pins.
